1. Basic Guide
1.1. Architectural Overview
Scorpio Broker is a reference implementation of NGSI-LD APIs. Scorpio Broker provides an implementation of REST API endpoints for various data context operations that conform to NGSI-LD API specification. Scorpio Broker component has been implemented based on modular, Microservices oriented, scalable, secure by design, easy to monitor/debug, fault-tolerant, and highly available architecture. Scorpio Broker based on NGSI-LD offers a unique feature of Link data context that provides self-contained (or referenced) dynamic schema definition (i.e. the context) for contained data in each message/entity. Thus allows the Scorpio Broker core processing to still remain unified even it gets dynamic context-driven data as its input from different types of data sources coupled(or designed for) with different schemas.
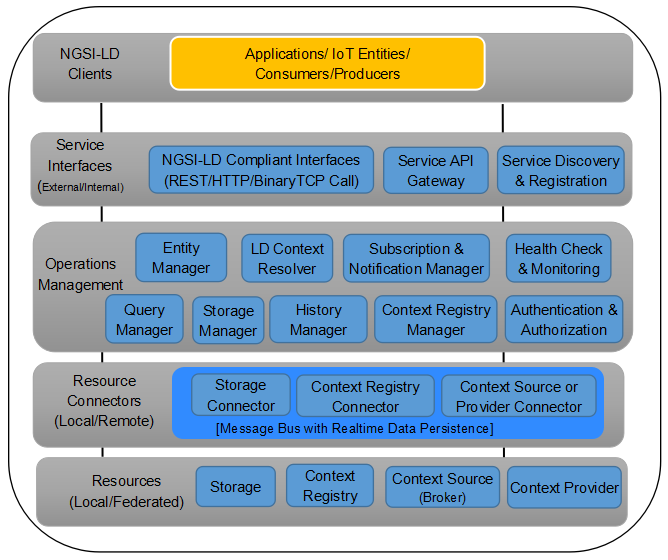
The basic architecture of the Scorpio Broker consists of five layers, the first layer consists of the Scorpio Broker clients which act as the producers and consumers. The second layer act as an interface between the Scorpio Broker and the external world this layer comprises the NGSI-LD Compliant Interfaces, Service API Gateway, and Service Discovery & Registration. The third layer contains all the micro-services and is responsible for the majority of tasks like entity CRUD operations etc. The fourth layer acts as the interface which connects different micro-services from the storage. The fifth layer is a Resources layer which acts as the storage for Scorpio Broker.
2. System Setup Guide
In order to set-up the environment of Scorpio broker, the following dependency needs to be configured:-
- Server JDK.
- Apache Kafka.
- PostgreSQL
2.1. Windows
2.1.1. JDK Setup
- Start the JDK installation and hit the “Change destination folder” checkbox, then click ‘Install.’
Note:- Recommended version is JDK-11. Scorpio Broker is developed and tested with this version only.

- Change the installation directory to any path without spaces in the folder name.
After you’ve installed Java in Windows, you must set the JAVA_HOME environment variable to point to the Java installation directory.
Set the JAVA_HOME Variable
To set the JAVA_HOME variable:
- Find out where Java is installed. If you didn’t change the path during installation, it will be something like this:
C:Program FilesJavajdk1.version
- In Windows 7 right-click My Computer and select Properties > Advanced.
OR
- In Windows 8 go to Control Panel > System > Advanced System Settings.
- Click the Environment Variables button.
- Under System Variables, click New.
- In the User Variable Name field, enter: JAVA_HOME
- In the User Variable Value field, enter your JDK path.
(Java path and version may change according to the version of Kafka you are using)
- Now click OK.
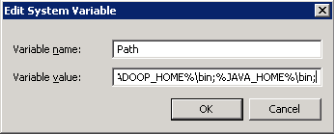
- Search for a Path variable in the “System Variable” section in the “Environment Variables” dialogue box you just opened.
- Edit the path and type ;%JAVA_HOME%bin at the end of the text already written there, just like the image below:
- To confirm the Java installation, just open cmd and type “java –version.” You should be able to see the version of Java you just installed.

If your command prompt somewhat looks like the image above, you are good to go. Otherwise, you need to recheck whether your setup version matches the correct OS architecture (x86, x64), or if the environment variables path is correct.
2.1.2. Setting Up Kafka
- Go to your Kafka config directory. For example:- C:kafka_2.12-2.1.0config
- Edit the file “server.properties.”
- Find and edit the line log.dirs=/tmp/kafka-logs” to “log.dir= C:kafka_2.11-0.9.0.0kafka-logs.
- If your ZooKeeper is running on some other machine or cluster you can edit “zookeeper.connect:2181” to your custom IP and port. For this demo, we are using the same machine so there’s no need to change. Also the Kafka port and broker.id are configurable in this file. Leave other settings as is.
- Your Kafka will run on default port 9092 and connect to ZooKeeper’s default port, 2181.
Note: For running Kafka, zookeepers should run first. At the time of closing Kafka, zookeeper should be closed first than Kafka. Recommended version of kafka is kafka_2.12-2.1.0.
2.1.3. Running a Kafka Server
Important: Please ensure that your ZooKeeper instance is up and running before starting a Kafka server.
- Go to your Kafka installation directory:** C:kafka_2.11-0.9.0.0**
- Open a command prompt here by pressing Shift + right-click and choose the “Open command window here” option).
- Now type .binwindowskafka-server-start.bat .configserver.properties and press Enter,then
- Type .binwindowskafka-server-start.bat .configserver.properties in new command window and hit enter.
2.1.4. Setting up PostgreSQL
Step 1) Go to https://www.postgresql.org/download.
Note: Recommended version is postgres 10.
Step 2) You are given two options:-
- Interactive Installer by EnterpriseDB
- Graphical Installer by BigSQL
BigSQL currently installs pgAdmin version 3 which is deprecated. It’s best to choose EnterpriseDB which installs the latest version 4
Step 3)
- You will be prompted to the desired Postgre version and operating system. Select the Postgres 10, as Scorpio has been tested and developed with this version.
- Click the Download Button, Download will begin
Step 4) Open the downloaded .exe and Click next on the install welcome screen.
Step 5)
- Change the Installation directory if required, else leave it to default
2.Click Next
Step 6)
- You can choose the components you want to install in your system. You may uncheck Stack Builder
- Click on Next
Step 7)
- You can change the data location
2.Click Next
Step 8)
- Enter the superuser password. Make a note of it
2.Click Next
Step 9)
- Leave the port number as the default
2.Click Next
Step 10)
- Check the pre-installation summary.
2.Click Next
Step 11) Click the next button
Step 12) Once install is complete you will see the Stack Builder prompt
- Uncheck that option. We will use Stack Builder in more advance tutorials
2.Click Finish
Step 13) To launch Postgre go to Start Menu and search pgAdmin 4
Step 14) You will see pgAdmin homepage
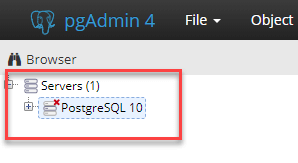
Step 15) Click on Servers > Postgre SQL 10 in the left tree
Step 16)
1.Enter superuser password set during installation
- Click OK
Step 17) You will see the Dashboard
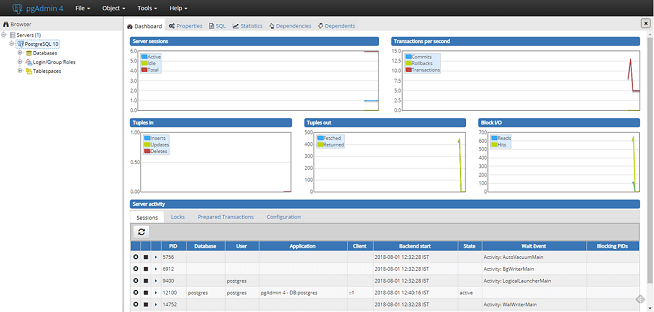
That’s it to Postgre SQL installation.
2.2. Linux
2.2.1. JDK Setup
To create a Java environment in your machine install the JDK, for this open the terminal, and run the following commands:-
- sudo apt-get update
- sudo apt-get install openjdk-8-jdk
To check that JDK is properly installed in your machine, run the command java -version in your terminal if it returns the version of the JDK as 11 then it’s working fine.
2.2.2. Setting Up Kafka
To download the Apache Kafka in your machine run the following commands one by one in your terminal.
- mkdir kafka
- cd kafka
- wget https://archive.apache.org/dist/kafka/2.2.0/kafka_2.12-2.2.0.tgz
- tar -xzf kafka_2.12-2.2.0.tgz
Once the Kafka is downloaded in your machine hit the following commands to get it run
- kafka_2.12-2.2.0/bin/zookeeper-server-start.sh kafka_2.12-2.2.0/config/zookeeper.properties > /dev/null 2>&1 &
- kafka_2.12-2.2.0/bin/kafka-server-start.sh kafka_2.12-2.2.0/config/server.properties > /dev/null 2>&1 &
2.2.3. Setting up PostgreSQL
In order to download the PostgreSQL in your machine run the following commands from your terminal.
- sudo apt update
- sudo apt-get install postgresql-10
- service postgresql status
The last command will give us the status of the PostgreSQL four your machine if this matches to one in the picture then everything is properly installed else re-run the commands. .. figure:: figures/postgresTerminal
Once PostgreSQL is successfully installed in your machine create the database ngb and change its role by running the following commands:
- psql -U postgres -c “create database ngb;”
- psql -U postgres -c “create user ngb with password ‘ngb’;”
- psql -U postgres -c “alter database ngb owner to ngb;”
- psql -U postgres -c “grant all privileges on database ngb to ngb;”
- psql -U postgres -c “alter role ngb superuser;”
- sudo apt install postgresql-10-postgis-2.4
- sudo apt install postgresql-10-postgis-scripts
- sudo -u postgres psql -U postgres -c “create extension postgis;
After this your PostgreSql is ready to use for Scorpio Boker.